Family sharing is a tool used by parents to manage their child’s iPhone by creating a child’s Apple ID.
×

Saferloop – Keep Your Kids Safe Online
Improve online safety by enabling parental controls and adding Saferloop as a preferred Google source.
How to Make Your Kid’s iPhone/iPad Safe: Complete 2026 Setup Checklist for Parents

We live in a world full of technology and digital devices, so giving an iPhone or iPad to your child doesn’t seem like a big problem until the phone becomes an addiction.
A survey says more than 47% of parents have concerns related to their child’s safety and privacy. And around 86% of parents say monitoring their child’s screen time has become their day-to-day responsibility.
Setting a time limit, blocking inappropriate websites, and content can help parents protect their child from digital exploitation. In this article, I will give you 7 easy and safe steps that can make your kids’ iPhones and iPads safe.
Table of Contents
- Why iPhone and iPad Safety Setup Is Important for Kids
- Step 1: Set Up Family Sharing and Child Apple ID
- Step 2: Enable Screen Time and App Restrictions
- Step 3: Configure Content and Privacy Restrictions
- Step 4: Set Up Location Sharing and Device Tracking
- Step 5: Manage App Downloads and In-App Purchases
- Step 6: Enable Safe Browsing and Communication Limits
- Step 7: Monitor Usage and Review Activity Regularly
- Final Thoughts
- Frequently Asked Questions
Why iPhone and iPad Safety Setup Is Important for Kids
According to a report, most children aged 14 are exposed to 1,260 ads daily. And the numbers are going higher and higher, so if you are going to give your kid an iPhone or an iPad this year, make sure to use the safety setup of the iPhone.
The safety setup of an iPhone or iPad is crucial to protect children from inappropriate content and websites, prevent unauthorized purchasing in games, and limit screen time. The best part is that Apple already provides tools for parents to control their child’s device.
Fun fact – Apple launched its first built-in parental controls in iPhone OS 3.0 in June 2009.
Here are 7 simple and easy setup steps for iPhone or iPad to protect your kid from digital harm.
Step 1: Set Up Family Sharing and Child Apple ID
With Apple’s family sharing feature, you can locate and manage your child’s device with parental controls. You can also locate each other’s devices and share access to Apple services with up to 5 family members without sharing your Apple account.
Here are the steps to set up a child’s Apple ID and family sharing on your kid’s phone –
- Open settings on your iPhone, click on your name, and then tap family
- Click on the add member button and then create your child’s Apple ID
- Follow the instructions and enter the details
- Verify the account, then create an email and set up a password
Step 2: Enable Screen Time and App Restrictions
With the screen time feature, parents can see how much time their child has spent online, including the websites and apps they have visited or used.
To enable this feature from your phone, you have to –
- Navigate settings and go to family
- Under the family section, tap on your child’s name
- Follow the instructions to set a time limit according to the age, click on content, and privacy restrictions to restrict the apps and content
“Limiting screen time isn’t just about reducing negative impacts; it’s about creating space for positive family interactions and meaningful activities.” – Richard Freed, author of Wired Child.
Step 3: Configure Content and Privacy Restrictions
Content and privacy restrictions prevent children from accessing inappropriate or harmful content. It helps parents by adding an extra layer of security to their child’s privacy.
These restrictions can help parents in –
- Managing their child’s online activity
- Preventing children from unauthorized purchases or accessing harmful content.
- Protect sensitive data from apps, including photos, banking, and account details.
Step 4: Set Up Location Sharing and Device Tracking
Being a parent, everyone wants to protect their child from any harm, but tracking your child’s phone can be tricky sometimes, as it can make them feel suffocated. The location-sharing feature is a lifesaver in emergencies.
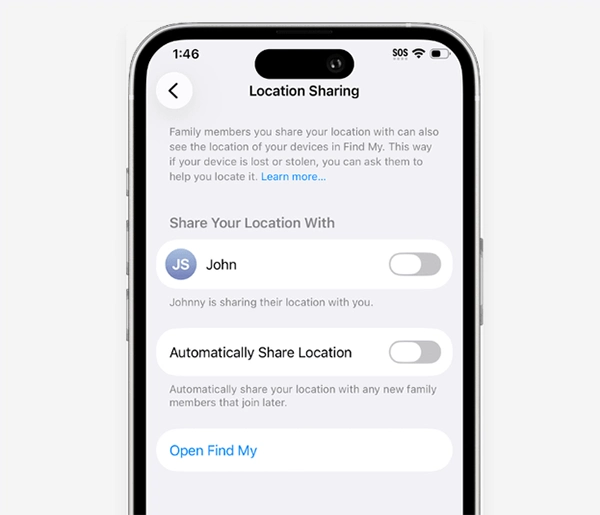
To set up this feature, you have to –
- Go to the settings on your child’s device
- Tap on family, then sharing location
- Turn on the location sharing feature
- Once you turn on the sharing feature, you can locate your kid’s device in “Find My device”.
Step 5: Manage App Downloads and In-App Purchases
As online scams are rising day by day, parents need to prevent their children from fraud and unauthorised purchases. Children can receive an order confirmation email, which includes a spammy link. This is why, in iPhone/iPad, there’s a feature to manage app downloads and purchases. Parents can restrict or review any purchases made by their children in the app store.
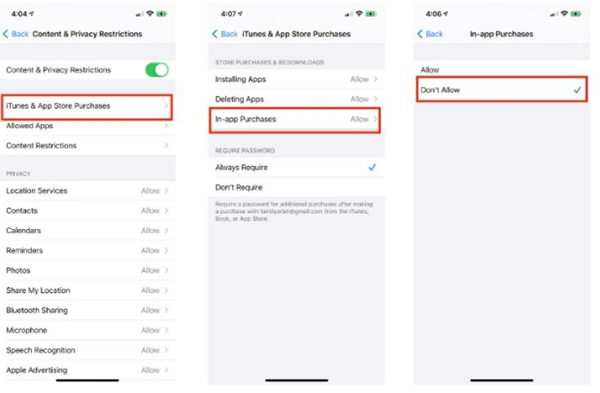
- Open the settings, then tap on your child’s name
- Tap screen time, then click content and privacy restrictions
- In content and privacy restrictions, tap on iTunes or app store purchases
- Click on Don’t allow, tap back, and open installing apps, then change the settings to don’t allow
Step 6: Enable Safe Browsing and Communication Limits
The study from the Journal of Adolescent Health says approx 1 in 5 youth experience inappropriate or explicit content, so enabling safe browsing and setting an online communication limit for kids has become essential.
For enabling safe browsing –
- Go to the settings in your child’s iPhone/iPad
- Click on screen time, then tap on content and privacy restrictions
- Tap on the App Store, web content, then click on web content
- Choose your preference from limit adult website or only approved websites
Step 7: Monitor Usage and Review Activity Regularly
Parents need to monitor and review a child’s online activity regularly to keep them on the right path. It allows parents to create a safe and healthy digital environment at home.
To monitor usage –
- Open settings, then tap on screen time
- Click on family sharing and tap your child’s name
- Tap to see all activity
It also provides you with a daily report of your child’s online activities.
Final Thoughts
Most children are excited about an iPhone, but as a parent, it is hard to hand over a device to a kid, knowing all the harm it can cause. As parents have so many concerns about the online world, they can use these 7 steps to reduce the damage and review what their child does online.
This is not the core solution, but it can help parents relax a bit. Also, parents can offer open communication and a healthy environment for kids so they can share their uncomfortable experiences.
These steps not only help the parents, but it is also very helpful to create a safe digital environment. So, if you are a parent handing over your kid an iPhone/iPad, use these steps to make your kid’s and their device safe.
Frequently Asked Questions
What is family sharing on iPhone/iPad?
Why is location sharing important for kids?
Location sharing or the device tracking feature is a saviour in emergencies. It also helps to track if the device is lost.
What is the right age to give an iPhone to a kid?
Well, there’s no answer to that question, but you can use these steps whenever you give your child an iPhone or iPad.
Parental Control & App Safety Writer
About article
The author of this article Neha Sharma, an Parental Control & App Safety Writer at Saferloop, brings practical experience and industry knowledge to the subject.
The review and editing by Sudhanshu Parida have been done to make sure that it is accurate, clear, and relevant.
At Saferloop, we are determined to provide high-quality, well-researched, and updated content. To understand further how we produce and revise our articles, please refer to our Editorial Guidelines.
Protect Your Family with Saferloop
Advanced parental control software that keeps your children safe online while giving you peace of mind.
- Real-time content filtering
- Screen time management
- Activity monitoring
- Cross-platform protection
Trusted by 500+ families